Debugging is the most important activity in the
software and program development. In order to remove or identify the logical
errors in the program; debugging is done. Linux uses the utility of ‘gdb’ (GNU
Debugger) to debug the programs. It has a strong instruction set but lacking in
visual GUI debugging utility.
DDD or Data Display Debugger is a visual debugger made
available under GNU public license uses the gdb activities with GUI at
foreground! Not only gdb but ddd has in-built command-line debuggers such as
DBX, JDB, HP Wildebeest Debugger (WDB), XDB, the Perl debugger, the Bash
debugger, the Python debugger, and the GNU Make debugger etc. So, by this visual
debugger you can debug programs of C, C++, Java, Shell, Perl, Python etc.
Here I am giving a small tutorial to show how to use
ddd to debug the C programs. The advanced tutorials will be given afterwards.
Let’s start… As I told ddd is available under GPL, so
you can download the debugger using following command directly by debian
version Linux.
sudo apt-get install ddd
or you may go to ‘Ubuntu Software Centre’ and search for
‘ddd’ as shown in the picture 1 below. You may get information about it and
install from there.
[Note: If images are not visible, click on it to view large]
 |
| Picture 1: DDD entry in Ubuntu Software Centre |
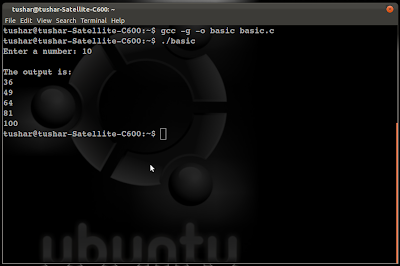
For example, you have written a C program code named ‘basic.c’.
Compile it using gcc in the following fashion:
gcc –g –o basic basic.c
here, -o suggests the name of the output file that you
will create after compilation of ‘basic.c’ and –g suggests that you are giving
ability to debug this program. If the –g is missing your program can’t be
debugged by gdb or ddd. After compilation you will get an executable file named
‘basic’ (without extension). Note: you may give any name to your executable file
at the time of compilation after option –o.
Your program will be compiled successfully as shown in
the picture 2 below.
 |
| Picture 2: Compilation of program for debugging |
Now, open your ‘ddd’ by simply typing ‘ddd’ on the
terminal.
Open your program ‘basic.’c by using ‘File’ menu ->
open program option. Your program will be opened as shown in the picture 3 below.
 |
| Picture 3: The ddd windows |
Your program will be visible in ‘Program Window’.
Below of it, you may find ‘Assembly Code Window’, where the assembly equivalent
code is shown. And below of this window, your gdb command line debugger is
shown. You may instruct program directly by using gdb also!
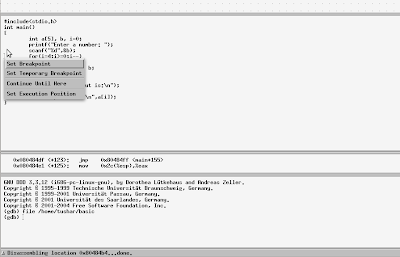
In order to set a breakpoint inside the program move
your mouse on to respective line and press right click. You may get options as
shown in the picture 4 below.
 |
| Picture 4 : Setting a breakpoint |
The any number of breakpoints can be set in a single
program. It is used for executing the program till that point. From that line
onwards, you may execute program step-by-step. The breakpoints in the function
can be set by typing the command ‘b main’ in the ‘gdb window’ also! Or ‘b 12’
can also be written. Here 12 is the line number in the program.
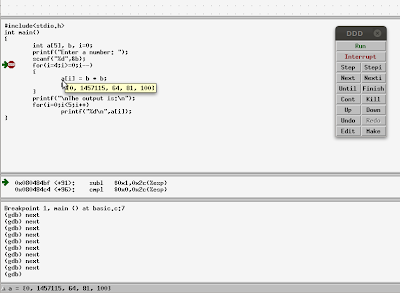
Now, go to ‘Program’ menu and click on the ‘Run’. Your
program will get executed till the first breakpoint set. See the picture 5
below:
 |
| Picture 5: Watch variable values by F6 |
The green arrow shows the line which is in execution currently.
Red dot shows the breakpoint. Now, from here onwards you may execute step-by-step
just by pressing function key ‘F6’. The program execution will be processed
step-by-step as you go on pressing ‘F6’. You may find arrow is traversing with
the lines of execution. When you move the mouse on any variable used in the
program, you may get the value of the variable on current execution. In the picture
5, you may see the values inside array ‘a’ is shown by the ‘ddd’ at mouse
position. By this way you can check the contents of the variable at any point
in the program.
You may check the content by typing the command in the
‘gdb window’ as shown in the picture 6 below. It has shown the contents of a[i]
by typing ‘print a[i]’ in the gdb window.
 |
| Picture 6: Use gdb window. |
The features of ‘ddd’ are not limited with this. It has
a rich set of applications. Just find the options given in the ‘ddd’s menu. You
will learn a lot!
